Setting Up a PPP Connection on a Windows 95
If you are already familiar with the details of setting up a PPP connection on a Windows 95 and just want the necessary server information, go to the Basic Account Configuration.
Step 1: Verify that Dial-up Networking is Installed
- Press the Start button, select Settings..., then Control Panel. Double-click the Add/Remove Programs icon. Select the Windows Setup tab, click on Communications and press Details.. Make sure that the Dial-up Networking option is selected. (checkmark)

If it is, go on to Step 2. If it isn't, select it and click OK. Windows 95 will attempt to install the needed drivers, Have your Win 95 disks or CD available! After the Dial-up Networking drivers are installed, you can proceed to step 2.
Step 2: Verify that Dial-up Adapter and TCP/IP Protocol are Installed
- Press the start button, select Settings..., then Control Panel. Double-click the Network icon. You'll see a dialog box . Make sure the Configuration tab is selected. If Dial-Up Adapter and TCP/IP are present, you're ready to proceed to step 3.
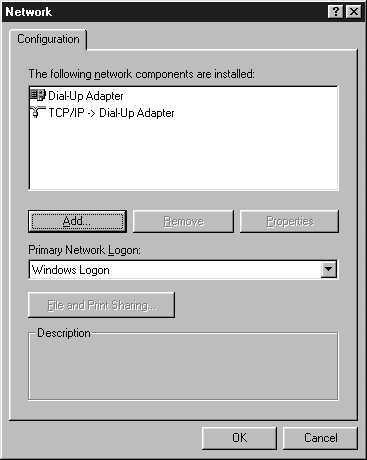
Otherwise:
To add the Dial-Up Adapter: hit the Add... button, double-click Adapter, then scroll down the list until you can select Microsoft. Choose the Dial-Up Adapter and hit OK.
To install TCP/IP: hit the Add... button, double-click Protocol, then select Microsoft, then TCP/IP, and hit OK.
Now your Network dialog box should Dial-Up Adapter and TCP/IP. Select the adapter, click Properties..., Bindings. Make sure the TCP/IP box is checked.
Step 3: Configure your TCP/IP Protocol
- Go to the Control Panel and double-click the Network icon. You should get a dialog box. Click on the TCP/IP protocol and press the Properties... button. You should get the TCP/IP Properties box.
There are six sections in this dialog box:
1. IP Address -- Check the Obtain an IP address automatically option.
2. WINS Configuration -- Select the Disable WINS Resolution option. You can enable it later when you want to run peer to peer networking (Winchat, Hearts, etc....).
3. Gateway -- Type in new gateway: 64.240.196.1, press the Add button.

4. Bindings -- No changes needed from the default.
5. Advanced -- No changes needed from the default.
6. DNS Configuration
Select the Enable DNS option.
In the Host box, enter get
In the Domain, put accesscom.com.
In the DNS Server Search Order section,
Type 64.240.196.2 and press the Add button.
Type 64.240.196.3 and press the Add button.
The Domain Suffix Search Order section should stay blank.
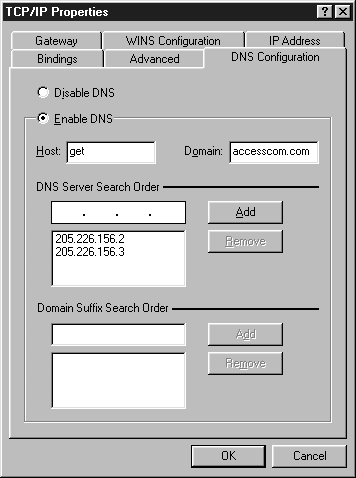
When you're all done setting these options, press the OK button. Then press the OK button in the Network dialog box. Windows 95 will ask you to reboot. Press Yes
Step 4: Set up the Connection Icon
- Click on My Computer from the desktop then double-click the Dial-Up Networking icon.
Double-click the Make New Connection icon.
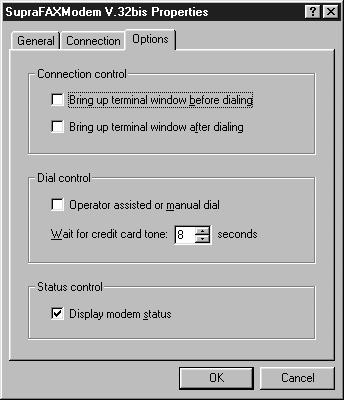
Type in "Access Internet" (or whatever you want). Your modem should be shown in the Select a modem:box. Press the Configure button and you'll get a dialog box.
In the General section, Select the highest speed you think you can connect at (I always choose 57600, your modem may support up to 115k per sec.)
DO NOT select Only connect at this speed.
Leave the Connection section alone.
On the Options section:
uncheck Bring up terminal window before dialing
uncheck the Bring up terminal window after dialing
Now hit the OK button.
Click the Next button.
Enter the Access Numbers (POPs) you will be using to connect to Access Internet. If you have call waiting, you may want to put *70, (with the comma) in front of the our number. This will disable it for this call only. Press the Finish button and confirm the creation of your new Icon
Step 5: Setting the Dial-Up Properties of Access Internet (or whatever you named it)
- Right-click on your new Icon and choose Properties...
You should get a dialog box.
Press the Server Type... button.
You'll get the Server Types dialog box.
In the Type of Dial-Up Server section, choose PPP:Windows 95, Windows NT, Internet.
Under Advanced options:
Check Log on to network
Uncheck Enable Software compression
Uncheck Require encrypted Password.
In the Allowed network protocols:
Uncheck NetBEUI
Uncheck IPX/SPX Compatible
Check TCP/IP
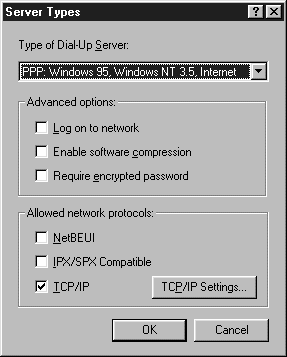
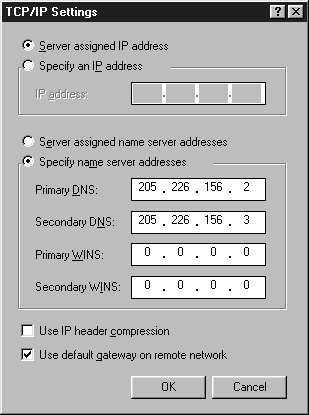
Click on TCP/IP Settings button
Check Server assigned IP address
Check Specify name server addresses
Primary DNS: 64.240.196.2
Secondary DNS: 64.240.196.3
Leave the rest blank
Click on the OK button
Then press the OK button.
Hit the OK button in the remaining dialog box, and you're ready to dial!
Step 6: Dialing in and Getting Connected
- Double-click your Access Internet icon.
You'll get the Connect To windows.
Put your username and password in the appropriate boxes.
This will be used later when you use scripts
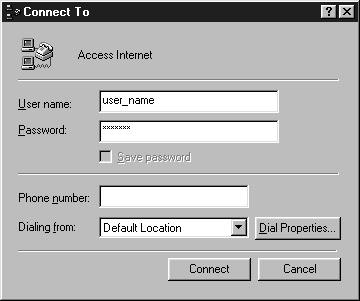
Press the Connect button and your modem should start dialing.
After a few rings, the Access Internet host machine should answer.
You should be connected to Access!